
You take beautiful pictures when you are outside. So beautiful that you start to wonder why you haven’t opened your our professional photography studio yet. You take a bunch of frame-worthy pictures as butterflies dance around your head.
Then, you bring your camera inside and the butterflies are gone. You are quickly reminded why you aren’t a sought-after photographer. Your pictures are blurry, dark, grainy, and yellow. Ugh!
Does this sounds familiar to you?
Don’t give up yet! We have all been there, my friend. Indoor photography is challenging. It tests your knowledge of camera settings, lighting options, and photography skills.
Taking your pictures from dark or blurry to crisp and bright is as simple as following these five tips below!
1) Find Light – and Use it!
The easiest way to improve your indoor photographs, is to use natural light in your home. Open the blinds, and get your subject by the light.
The only difference between the below two photographs is that my daughter was standing one foot closer to the window in the picture on the right.

Farther from Window 
Closer to Window
If possible, have your subject face the light source, such as a window. This will give you beautiful catch-lights, which brighten up your subject’s eyes.

Sometimes, natural light is not an option. It is great to have an external flash handy in these situations. An external flash, or speed-light, is a great tool for low light situations. If you chose to use an external lighting source, make sure you learn how to use it properly.
Check out this quick 5 minute video to learn all about your lighting options and how to use them!
I use this affordable flash, and it works great for indoor pictures!

2) Pay Attention to Shutter Speed
Shutter speed should be your primary focus! If you set your camera to auto-mode, the first thing your camera will do for indoor photographs is think (yes, your camera can ‘think’!) “It is dark in here, so I am going to lower my shutter speed”. Lowering the shutter speed will allow more light to get into your camera; HOWEVER, it will also create a lot of movement blur. This is why your indoor pictures are often blurry.
To better understand your camera settings, check out this super-beginner explanation of camera settings, or these quick video tutorials!
For indoor photos, you should set your camera to either shutter speed priority mode or manual mode. Then, set your shutter speed to around 1/125s.
To make sure your picture isn’t too dark, you will most likely have to alter your other camera settings. To allow for better pictures in low light, you will can make the following two adjustments.
- Lower your f stop (such as f = 3)
- Higher your ISO (such as to ISO = 800)
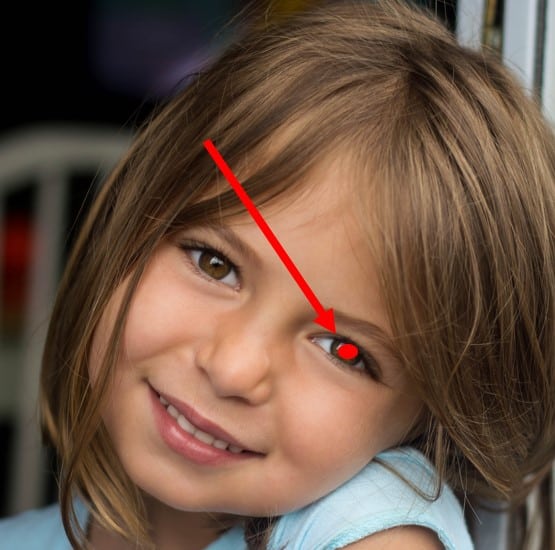
3) Focus on the Eyes
When you look through your camera, you will see something like the below pattern through your view finder.
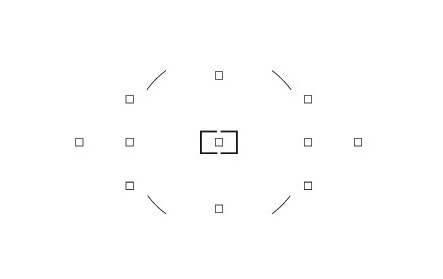
These tiny squares are your potential focal points, or where your camera will focus on. The focal point will show up as a red dot on your view finder.
In auto-mode, your camera will make a GUESS at where you want to focus. When you select the setting “single point focus”, you will be able to move the red dot to where you want to focus.
When you are taking pictures, especially indoors, you want to make sure you are focusing on the most detailed part of your photograph. If you are taking a portrait, place the red dot on the the subject’s eye – and make sure it is the closest one to you.
4) Adjust White Balance
When you are taking pictures, think of white balance as the ‘color’ of the light in the room. Often when photographing indoors, your camera will pick up on cool tones from light bulbs, and this may result in a yellow tone in your pictures.
To adjust for this, you may need to change your white balance. You can change this mode manually, or you can chose one of the available white balance modes (which I recommend for beginners!).
Often, when I am taking indoor pictures, I will select the Tungsten or Fluorescent white balance modes to improve the tones. The below two picture were taken just moments apart. By simply adjusting the white balance, removed the yellow tones in the portrait.

WB = Auto 
WB = Tungsten
5) Get a 50 mm Lens
Usually, I am a big preacher that knowledge and practice outweigh expensive photography gear any day. I am still sticking by that school of thought; however, for indoor photography there is one item that I highly recommend!
If you don’t have a 50 mm lens, do yourself a favor and check it out. The 50 mm lens is sometimes called the “normal lens”, because it takes pictures the way your eyes actually see things. I take 99.5% of my pictures with my 50 mm lens.
The 50 mm lens is fantastic in low light situations, which makes it a great tool for indoor photography. It also allows for a very low “f stop”, which means that it takes pictures with beautiful background blur.
Summary
Upgrade your indoor photos from yellow, blurry ‘delete-ables’, to bright and clear ‘frame-ables’ with these easy tips:
- Get close to natural light
- Make sure your shutter speed is set to a fast setting
- Always focus on the eyes
- Adjust white balance as needed
- Invest in a 50 mm lens!
I hope this made snapping a little more simple for you! If so, share it!


lindapurcell724gmailcom
Monday 24th of February 2020
Thanks. Any ideas when using your iPhone?
admin
Monday 24th of February 2020
Yes Check out my post here: http://www.simplyrootedfamily.com/2019/09/23/dramatically-transform-your-photography-with-these-5-simple-lighting-rules/
These will improve any picture, whether with a camera or phone! Thanks!
Annette
Tuesday 18th of February 2020
loved your video it was very helpful...
Indoor Photography Tips – easypin
Sunday 5th of January 2020
[…] Source by simplysnapping […]
Quick Tips for Sharp Indoor Pictures -
Tuesday 27th of August 2019
[…] For more details on indoor photography, check out this post. […]
4 Tips for a Stunning Side-by-Side Portraits -
Tuesday 18th of June 2019
[…] more easy to follow tips on indoor photography or outdoor photography check out these […]